yeovil at War
Edward Bernard Gray
Killed after four years of fighting
It is known that Edward Bernard Gray was born in Yeovil but details of his family and early life are completely unknown.
 It
is known that
Edward enlisted
at Yeovil. He
joined the 1st
Battalion of the
Somerset Light
Infantry and his
Service Number
7981 suggests
that he enlisted
as a
professional
soldier in the
summer of 1906.
It
is known that
Edward enlisted
at Yeovil. He
joined the 1st
Battalion of the
Somerset Light
Infantry and his
Service Number
7981 suggests
that he enlisted
as a
professional
soldier in the
summer of 1906.
The 1st Battalion was stationed in India until 1908 so it is most likely that Edward served there for at least a year.
At the outbreak of war in 1914 the 1st Battalion was in Colchester, with 11th Brigade, 4th Division. The Battalion landed at Le Havre, France with the British Expeditionary Force (BEF) on 22 August 1914, in time to fight in the battle of Le Cateau during the retreat from Mons. The 1st Battalion, Somerset Light Infantry remained on the Western Front with 4th Division, throughout the war, suffering 1,315 losses.
Edward Gray, who rose to the rank of Corporal, saw four years of almost continual fighting as he most likely took part in all the following battles with the 1st Battalion of the Somersets.
In 1914 the 1st Battalion saw action at the Battle of the Marne, the Battle of the Aisne and at the Battle of Messines.
The First Battle of the Marne, fought from 5 to 12 September 1914, resulted in an Allied victory against the German Army. The battle was the culmination of the German advance into France and pursuit of the Allied armies which followed the Battle of the Frontiers in August, which had reached the outskirts of Paris. The counterattack of six French field armies and the British Expeditionary Force (BEF) along the Marne River forced the German Imperial Army to abandon its push on Paris and retreat north-east, leading to the 'Race to the Sea' and setting the stage for four years of trench warfare on the Western Front. The Battle of the Marne was an immense strategic victory for the Allies, wrecking Germany's bid for a swift victory over France and forcing it into a drawn-out two-front war.
The First Battle of the Aisne was the Allied follow-up offensive against the right wing of the German First and Second Armies as they retreated after the First Battle of the Marne earlier in September 1914. The offensive began on the evening of 13 September, after a hasty pursuit of the Germans. When the Germans turned to face the pursuing Allies on 13 September, they held one of the most formidable positions on the Western Front. Low crops in the unfenced countryside offered no natural concealment to the Allies but deep, narrow paths cut into the escarpment at right angles, exposing any infiltrators to extreme hazard. In dense fog on the night of 13 September, most of the BEF crossed the Aisne on pontoons or partially demolished bridges. Under the thick cover of the foggy night, the BEF advanced up the narrow paths to the plateau. When the mist evaporated under a bright morning sun, they were mercilessly raked by fire from the flank. Those caught in the valley without the fog's protective shroud fared no better. It soon became clear that neither side could budge the other and since neither chose to retreat, the impasse hardened into stalemate that would lock the antagonists into a relatively narrow strip for the next four years.
The Battle of Messines, fought between 12 October and 2 November 1914, was part of the 'Race to the Sea', the series of battles that decided the line of the Western Front. In the aftermath of the first Battle of the Marne, it was decided to move the BEF back north to Flanders, to shorten its supply lines back to the channel ports. The Battle of Messines was the official name for the fighting between the river Douve and the Comines-Ypres canal, but it merged into the battle of Armentières to the south and the first battle of Ypres to the north.
In 1915 the 1st Battalion, Somerset Light Infantry fought in the Second Battle of Ypres.
The Second Battle of Ypres, 22 April-25 May 1915, was a rare German offensive on the Western Front during 1915. It was launched with two aims in mind. The first was to distract attention from the movement of German troops to the eastern front in preparation for the campaign that would lead to the victory of Gorlice-Tarnow. The second was to assess the impact of poisoned gas on the western front. Gas had already been used on the eastern front, at Bolimov (3 January 1915), but the tear gas used there had frozen in the extreme cold. At Ypres the Germans used the first lethal gas of the war, chlorine. The gas was to be released from 6,000 cylinders and would rely on the wind to blow it over the allied trenches. This method of delivery controlled the timing of the attack – the prevailing winds on the western front came from the west, so the Germans had to wait for a suitable wind from the east to launch their attack. The line around Ypres was held by French, Canadian and British troops. The attack on 22 April hit the French lines worst and, not surprisingly, the line broke under the impact of this deadly new weapon. The gas created a gap 8,000 yards long in the Allied lines north of Ypres. The success of their gas had surprised the Germans who didn’t have the reserves to quickly exploit the unexpected breakthrough, allowing enough time to plug the gap with newly arrived Canadian troops. During the battle the British, French and Canadians suffered 60,000 casualties, the Germans only 35,000.
In 1916 the 1st Battalion moved south and were in action during the Battles of the Somme.
The Battle for the Somme has a unique place in British military history. Haig was in the middle of preparations for a British offensive but came under strong pressure to mount an attack due the French commitment to the Battle for Verdun, a city which held an important place in the nation's psyche and that the Germans had attacked in February 1916. Any Allied offensive would therefore have to be carried mainly by the British. Haig was therefore forced to undertake an offensive near to where the British and French lines met, near Bray-sur-Somme in Picardy, although he would have preferred to attack further north and to have had longer with which to prepare his new army. The battlefield was bisected by both the Albert – Bapaume Road and the River Somme, and was a series of gentle chalk ridge lines into which the Germans had dug a series of well-prepared fortifications. Haig's plan called for Rawlinson’s Fourth Army to achieve a breakthrough in the centre after which Gough’s Reserve Army (later renamed the Fifth Army) would exploit, roll up the German defences and capture Bapaume. Allenby's Third Army would undertake a diversionary attack on Gommecourt, which lay to the north. The massive preparatory bombardment, meant to destroy the German defences started on 24 June 1916 at 06.00. Over 1.7 million shells were fired but a high proportion, some 30 percent, failed to explode as the Ministry of Munitions had abandoned any semblance of quality control in order to be able to produce the quantities needed in time. Tunnelling companies dug hollowed out chambers underneath key German strongpoints and filled them with explosives. The shelling had started on 'U' Day and was meant to go on until 'Z' Day, which was 29 June 1916 but heavy rains caused the approach roads, trenches and crater ridden No-Man's land too muddy and so the assault was postponed until 1 July. Just after dawn on 1 July, the first British wave clambered out of their trenches and started to make their way towards the German frontline. As they did, seventeen enormous mines were detonated and the barrage moved forward. The infantry followed behind and although there were local gains on the first day, generally things looked bleak. The British suffered 57,470 casualties (19,240 killed and 2,152 missing) which was an unprecedented experience for the British Army. Seven 'New Army' divisions attacked, alongside three Territorial and four regular Army divisions. The French attack on the right of the British line was smaller than had been originally intended as troops had to be diverted to the fighting around Verdun but their attack went relatively successfully and the preponderance of heavy guns in the French sector also helped the British forces adjacent to them.
The British Army suffered, over the course of the entire 142-day campaign, some 415,000 casualties. The Somme campaign involved some twelve separate battles and finally came to an end on 18 November 1916.
In 1917 the 1st Battalion were at Arras, in action during the the First and Third Battles of the Scarpe, before heading north for the Third Battle of Ypres, where they fought in the Battle of Polygon Wood, the Battle of Broodseinde, the Battle of Poelcapelle and the First Battle of Passchendaele.
The Second Battle of Arras, fought between 9 April and 16 May 1917, was the British contribution to the Allied spring offensive of 1917. The original Allied plan for 1917, agreed at the Chantilly conference of November 1916, was for a second offensive on the Somme, but that plan was abandoned after a change of French leadership and it was decided that the British would attack around Arras and involve troops from three armies. In the north the Canadian corps of the First Army would attack Vimy Ridge. In the centre of the line the Third Army under General Allenby would attack from Arras. Finally, the British Fifth Army under General Gough would attack on the right of the line. The entire British attack was supported by 2,879 guns each of which had close to 1,000 shells. The British attack made impressive progress, but it did not achieve a breakthrough on the first day, allowing the Germans to rush their reinforcements into the gap and launch a series of counterattacks thereby slowing down the British attack. A renewed British attack at Bullecourt on 11 April failed to make any progress and the attack was suspended. The month of fighting around Arras cost the British 84,000 casualties and the Germans 75,000. Tactically it was a clear British victory, but the overall plan to cut off the German salient had failed.
Field Marshal Sir Douglas Haig thought that Flanders presented a much more attractive target than the Somme as it was close to the main British sources of supply, was familiar to his staff and offered the chance of a breakthrough with targets such as the German railhead at Roulers and the Channel ports from which German submarines were conducting operations (he was under pressure from the Admiralty to clear the Flanders coast). The attack was preceded by the assault of Plumer's Second Army on Messines on 7 June 1917 with the main attack coming on 31 July from Gough's Fifth Army - a little too late as it happens for the momentum had been lost in the interval. It consisted of three phases - the first being the battles for Pilckem Ridge, Gheluvelt Plateau and Langemarck where the Fifth Army pushed its way into a salient made all the more boggy by unseasonal weather and the shelling had badly damaged the land drainage system. Secondly, Second Army took over with the battles for Menin Road Ridge, Polygon Wood and Broodseinde, making good progress in the central sector. Finally, in the battles for Poelcappelle and Passchendaele the attackers, who were by this time exhausted, fought their way onto Passchendaele Ridge in appalling conditions, with the Canadians taking the village on 6 November 1917. The British lost well over 200,000 men, with the Germans losing a similar figure and the battle badly affected the morale of both sides, with the word 'Passchendaele' becoming a byword for suffering.
The Battle of Polygon Wood, 25-27 September 1917, was part of the wider Third Battle of Ypres. It came during the second phase of the battle, in which General Herbert Plumer’s Second Army was given the lead. Plumer replaced the ambitious general assaults that had begun the battle with a series of small attacks with limited objectives – his “bite and hold” plan. These attacks involved a long artillery bombardment followed by an attack on a narrow front (2,000 yards wide at Polygon Wood). The attacks were led by lines of skirmishers, followed by small infantry groups. German strong points were to be outflanked rather than assaulted. Each advance would stop after it had moved forward 1,000-1,500 yards. Preparations were then made to fight off any German counterattack. The attack on Polygon Wood was the second of Plumer’s “bite and hold” attacks, after Menin Road. It was carried out chiefly by the 4th and 5th Australian Divisions but the 1st Battalion, Somerset Light Infantry also played a part. The target was a line just beyond Polygon Wood (a wood in name only by 1917, having lost all of its trees in earlier fighting). The site of Polygon Wood was captured on 26 September, the target line on 27 September. The attack then stopped, and Plumer prepared for the next attack. The two Australian divisions lost 5,471 men during the Battle of Polygon Wood. The three “bite and hold” attacks brought the front line to the foot of the Passchendaele Ridge, which would be come the target of the First and Second Battles of Passchendaele, and give its name to the entire battle.
The Battle of Broodseinde, 4 October 1917, was the last of three successful “bite and hold” battles launched by General Herbert Plumer during the middle phase of the Third Battle of Ypres. Both sides were planning an attack on 4 October. When the British bombardment began, it caught a number of German units out in the open preparing for their own attack. The British attack contained divisions from Britain, New Zealand and Australia. As at Menin Road Ridge and Polygon Wood, the British attack achieved its main objectives and then halted to dig in. Although these attacks are normally described as small scale battles, the casualty figures demonstrate the real scale of the fighting. The Germans suffered 10,000 casualties and lost 5,000 prisoners. On the Allied side the Australians suffered 6,432 casualties, the New Zealanders 892 and the British 300.
In 1918 the 1st Battalion saw action on the Somme, then returned to Flanders fighting in the Defence of Hinges Ridge during the Battle of Hazebrouck (12 to 15 April 1918). On 12 April, the Sixth Army renewed its attack in the south, towards the important supply centre of Hazebrouck. The Germans advanced some 2–4 kilometres (1.2–2.5 mi) and captured Merville. During the Battle of Hazebrouck the British Fourth Division, which included the 1st Battalion, Somerset Light Infantry defended Hinges Ridge.
It is likely that Edward was mortally wounded during the Defence of Hinges Ridge. He died on 17 May 1918 and was interred in Le Vertannoy British Cemetery, Hinges - Grave B.14. His name is inscribed in the County of Somerset Book of Remembrance in St Martin’s Chapel, Wells Cathedral and is recorded on the War Memorial in the Borough.
gallery
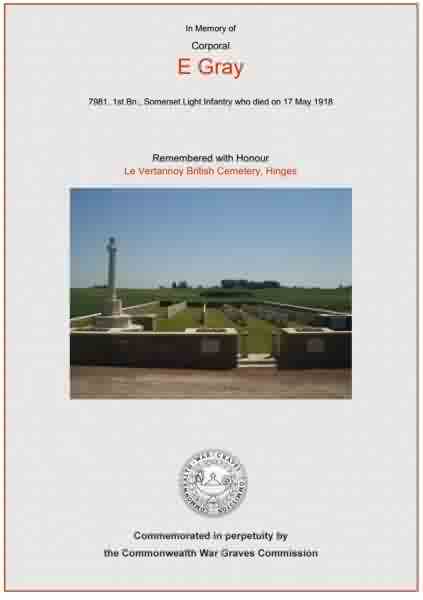
The Commonwealth War Graves Commission certificate in memory of Edward Gray.